

Trail Cameras
Is a Trail Camera Security Box Worth Buying?
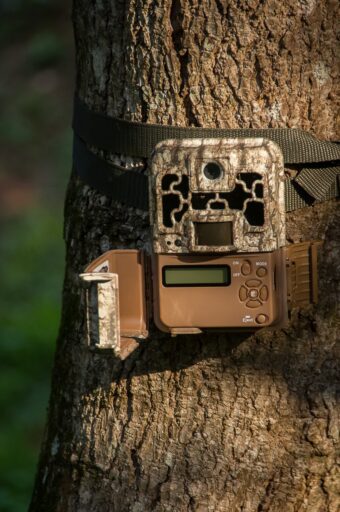
Sep
Security adds friction for thieves—and for camera owners.
At a shared trail gate, a camera can disappear between checks, taking weeks of images with it. A steel security box makes a quick grab harder and can shield the housing from tampering or animal damage. Its value rises when the camera is remote or stores images locally. A cellular camera that has already transmitted its images reduces the data-loss risk, though replacing the unit remains a hassle.
The box is only as secure as its mounting. A weak cable or exposed padlock remains vulnerable, while a poorly fitted enclosure can obstruct sensors, flash, or antenna reception. Extra weight and slower battery access also matter on frequently serviced cameras.
Match protection to the location
A camera beside a public trail, gate, or well-used access road faces a different risk from one deep on private ground. Casual passersby may remove an exposed camera simply because it is easy to reach. A steel box and locked cable can make that opportunistic theft less convenient, though neither prevents a determined person from cutting the mount or taking the whole assembly.
Deliberate tampering calls for different thinking. A conspicuous box may protect buttons and the SD-card door, but it can also advertise the camera’s position. Where interference is plausible, mounting higher, avoiding obvious sightlines, and checking whether the lens and sensor remain unobstructed may matter as much as adding steel.
On quieter sites, people may be the lesser concern. Deer can jostle a camera at a scrape; bears may bite or pull at it; falling branches and equipment can knock it off angle. A rigid box helps against impacts, but a strong mount and sensible height still matter. When securing a camera on rut travel corridors, consider both animal contact and how visible the setup is from nearby access routes.
What a steel box actually protects
A close-fitting steel box makes a trail camera harder to open, pull off its mount, or damage with a glancing blow. It can discourage quick theft and shield the housing from curious animals, falling branches, and routine knocks. Openings for the lens, flash, and motion sensor still leave those components exposed; the box is armor around the camera, not a sealed vault.
The installation often sets the limit on protection. A tough enclosure attached with a cuttable strap can leave with the camera; exposed screw heads can be removed, and an accessible padlock shackle can be cut. Lag bolts in sound wood, recessed fasteners, and a lock protected by the box make removal more time-consuming, but a pry bar or power tools can still defeat the assembly. Extra steel may also make a camera more conspicuous.
A box protects hardware, not the files on a missing SD card. If the whole assembly disappears, locally stored images disappear with it. Cellular cameras can retain images already uploaded to a remote account, but photos awaiting transmission remain vulnerable when coverage or battery power fails.
Before relying on an enclosure, check the easiest removal route: cutting the strap, undoing fasteners, prying the door, or lifting the entire mount. Reinforce that point first.
Check the box against the exact camera
-
Confirm the model and revision
A fit claim is only a starting point: compare the actual camera with the box, including its antenna, connectors, and door swing. A snug cavity is no use if the camera cannot be installed or removed without forcing it.
Look forModel-specific fit verified with the camera in handAvoidRelying on a brand-level compatibility claim -
Check the viewing and sensing openings
With the door closed, the lens, PIR sensor, and infrared LEDs each need a clear path. A steel lip can narrow the field of view or reflect infrared light back into night images even when the lens appears unobstructed.
Look forSeparate, correctly aligned clearances for optics and sensorsAvoidAn oversized window that still clips the PIR or catches IR glare -
Account for signals and sound
Metal can weaken a cellular camera’s signal, so check antenna placement and any route for an external antenna lead. An enclosure may also muffle a microphone if no suitable opening faces it.
Look forAntenna clearance and a usable microphone openingAvoidTrapping an antenna behind steel or assuming audio will be unchanged -
Test power and service access
Check the power connection, battery compartment, SD-card slot, and service doors while the camera is mounted and the box is locked. Universal boxes may fit the body but require awkward cable bends or camera removal for routine access.
Look forUnpinched leads and practical access for battery and card changesAvoidChoosing fit by exterior dimensions alone
Inspect the details that fail first
Steel thickness matters, but a box can still be easy to open if its door has a wide gap or a lock tab flexes under pressure. Look for an overlapping door edge, close hinge fit, and welds that run cleanly where the hinge and lock tabs join the shell. A thick panel offers less protection when a screwdriver can reach a pry point beside it.
Check the box with the door locked. Mounting screws should be inaccessible from outside, and an exposed hinge pin should not let the door lift free. A recessed lock position can make the shackle harder to reach, though it must still leave enough room to operate the lock with cold hands. Close the door several times: it should latch without forcing the camera or pinching its cables.
Long deployments also test the finish. Scraped coating around welds and fastener holes can become rust sites; water entering a top seam or collecting behind the camera can damage the equipment inside. Bottom drainage should let condensation and meltwater escape without putting a large opening directly beneath the camera. That trade-off becomes more important when protecting gear through cold-weather scouting.
Test the camera inside the box
A box that fits on paper can still change what the camera captures. Test it with the door closed, mounted at the intended height and angle. Check the image edges for metal in the frame, then walk across the target area at several distances. An unobstructed lens does not guarantee that the motion sensor’s detection pattern is unobstructed.
Repeat the walk test after dark. Infrared light can bounce off a cutout edge or the inside of the door, producing a bright haze while leaving the subject underexposed. Review actual night images rather than relying on a daytime preview. If the box has a narrow viewing opening, confirm that the camera can still be aimed where needed without tilting its housing against the steel.
For a cellular model, compare signal strength and successful uploads with the box closed in its installed position against the unboxed camera at the same spot. Leave clearance for any external antenna and check that the door does not pinch its lead. External power cables need a protected exit, strain relief, and a downward drip loop; test the camera again after routing them, since a cable can shift its aim or prevent the door from sealing.
Mount the box without creating a weak point
A box fixed firmly to a substantial tree or post is generally harder to twist, swing, or pull away than one hanging chiefly from a cable. Movement also changes the camera’s aim and can cause branches to trigger it repeatedly. On a living tree, allow for growth and inspect the attachment periodically; on a post, check that the post itself cannot be lifted or rocked loose.
Fasteners are less inviting when their heads sit inside the locked enclosure. A cable can add retention, but it should not be the only thing keeping a heavy box steady. Keep the lock accessible for battery and card changes without leaving its shackle prominently exposed. Before tightening everything, open the door fully and confirm that routine servicing will not require dismantling the mount.
-
Test-fit at the chosen height
Hold the closed box in place, then check sightlines, door swing, and clearance for straps or cables.
-
Fix it to a stable support
Seat the box flush, tighten the attachment, and push gently from several directions to detect movement.
-
Secure the access points
Check that mounting fasteners cannot be reached with the door locked and that the lock closes without binding.
-
Verify the working view
Check framing and walk through the detection area to confirm triggers with the box shut.
-
Confirm upload and service access
For cellular cameras, confirm a test image arrives. Reopen the box to ensure batteries and cards remain reachable.
Choose protection in proportion to exposure
A box earns its place when it addresses a likely threat without making the camera harder to operate. The mounting surface and maintenance schedule matter as much as the steel thickness.
| Site and setup | Proportionate choice | Check before buying |
|---|---|---|
| Exposed access route with a costly camera | A model-specific steel box with protected mounting fasteners and a shrouded lock may be worthwhile. | Confirm a rigid tree or post can support it, the door opens without removing the box, and cellular uploads still work when closed. |
| Moderate-risk location with occasional visitors or animal contact | Consider a lighter fitted box for impact protection, or a cable lock where removal is the main concern. | A loose strap can let a box shift and spoil aim; a cable alone leaves the camera exposed to damage. |
| Quiet site with low interference | A secure mount, discreet placement, or modest height increase may suffice. | Avoid adding an enclosure if it complicates battery changes or impairs reception without addressing a plausible risk. |
Frequent servicing changes the calculation: a box that requires dismounting for every battery or card change creates repeated chances to loosen the mount or disturb aim. At rarely visited sites, stronger protection may be more useful—but only if the installation remains stable and the closed camera performs reliably.
When a box earns its keep
A box is easier to justify when a camera must remain at a productive viewpoint that people regularly pass. If the location is flexible, moving it away from an obvious path may reduce encounters without adding hardware. Concealment can deter casual discovery, though it offers little protection once the camera is found.
Other approaches solve narrower problems:
- Cable and lock: May slow removal with less bulk, but leave the camera exposed to impacts and tampering. The cable is only as useful as its anchor point.
- Less costly camera: For a site with occasional losses, a budget-friendly camera setup may limit replacement expense, though lost images still matter.
- Cellular delivery: Can preserve images uploaded before a camera disappears. It does not protect the device or files still waiting to transmit.
The calculation also includes fieldwork. Steel adds carrying weight and installation time; battery swaps and card changes may require unlocking a stiff door and working in a tight opening. Before committing, test whether the box reduces detection range, causes infrared glare, or weakens uploads at the intended mount. If those penalties or frequent service visits outweigh the likely loss, a simpler measure may be the more practical choice.
A security box is worth considering when theft or damage is a credible risk—not merely a possibility. Before buying, confirm that the enclosure fits the exact camera and its antenna or cables, the mounting tree or post is rigid, and the locked door shields both the fasteners and the lock from easy access. Then test the camera with the door closed: detection, night images, cellular uploads, and routine servicing still need to work.
If any of those checks fails, more steel may add inconvenience without protecting the camera. A less exposed location, a better mount, or another restraint may address the actual weakness more effectively. The box should support the broader trail camera scouting system, not compromise the images it was installed to protect.
